HyperHDR leverages the ESP32 for enhanced ambient lighting‚ utilizing SPI communication for faster data transfer and improved performance with LED strips like HD107․
This tutorial guides you through setting up HyperHDR with an ESP32‚ offering a superior alternative to HyperSerial for larger LED setups and advanced features․
What is HyperHDR?
HyperHDR represents a significant advancement in ambient lighting technology‚ designed to dynamically mirror the content displayed on your screen onto an LED strip․ It’s not merely a color-matching system; HyperHDR employs an advanced video pipeline that dramatically enhances the LED output‚ resulting in a remarkably smoother and more immersive experience․
Unlike traditional methods‚ HyperHDR focuses on capturing and processing the video signal to extract meaningful color and brightness information․ This allows for a more accurate and responsive representation of the on-screen content․ The system offers various connection options‚ including HyperSPI‚ HyperSerialESP32‚ and HyperSerialWLED‚ each catering to different hardware configurations and performance needs․ It’s a fork optimized for USB serial port connections at 2Mb speed․
The Role of ESP32 in HyperHDR
The ESP32 plays a crucial role in HyperHDR‚ acting as the central processing unit for controlling the LED strip and handling the incoming video data․ Its processing power enables the complex algorithms required for accurate color extraction and dynamic lighting effects․ Specifically‚ utilizing HyperSPI with the ESP32 unlocks data transfer speeds of up to 40Mhz‚ essential for high-density LED strips like the HD107․
Compared to the ESP8266‚ the ESP32 offers superior performance and connectivity options‚ making it the preferred choice for demanding HyperHDR setups․ It facilitates faster communication with the Raspberry Pi and allows for more complex lighting modes beyond those available in standard WLED or HyperSerialEsp8266․ The ESP32’s capabilities are key to achieving a truly immersive ambient lighting experience․
Why Choose SPI for HyperHDR?
SPI (Serial Peripheral Interface) is the optimal communication protocol for HyperHDR‚ particularly when paired with the ESP32․ Unlike HyperSerial‚ which relies on USB serial communication limited to 2Mb speed‚ HyperSPI achieves significantly faster data transfer rates – up to 40Mhz with the ESP32․ This speed is critical for driving larger LED arrays‚ like those using the HD107 strip‚ ensuring smooth and responsive lighting․
The increased bandwidth of SPI prevents buffering issues that can occur with HyperSerial when handling substantial data streams․ It also unlocks the potential for unique and advanced lighting modes unavailable with other methods․ While HyperSerialESP32 is an option‚ HyperSPI consistently delivers superior performance and reliability for a truly immersive HyperHDR experience․

Hardware Requirements

Essential components include an ESP32 development board‚ compatible LED strip (like HD107)‚ optional Raspberry Pi‚ and a Mean-Well LRS-150F-5 power supply․
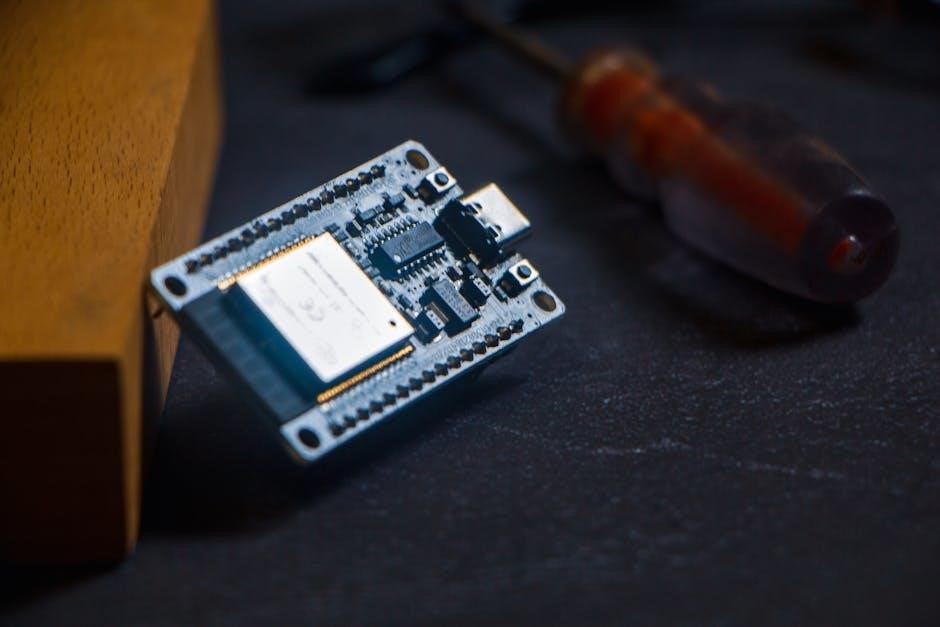
ESP32 Development Board
The ESP32 is the core of this project‚ chosen for its robust processing power and‚ crucially‚ its support for high-speed SPI communication․ This capability is vital for driving HyperHDR with larger LED counts and achieving the desired 40Mhz data transfer rates‚ particularly when using HD107 LED strips․
Any standard ESP32 development board will generally suffice‚ but consider models with sufficient GPIO pins to accommodate the SPI interface (SCK11‚ MISO9‚ MOSI10 when using the default spidev0․0 configuration) and the LED strip data line․ Ensure the board can handle the power requirements of the LED strip‚ or plan for external power solutions․ The ESP32’s ability to handle complex data processing makes it ideal for HyperHDR’s advanced video pipeline․
LED Strip Compatibility (HD107 and others)
HyperHDR shines with addressable LED strips‚ and the HD107 is a popular choice due to its high density and vibrant colors․ However‚ compatibility extends beyond just HD107; many other RGB and RGBRGBW strips can be utilized; The key is ensuring the chosen strip is controllable via a single data line and supports the appropriate color order․
The RGBRGBW algorithm is crucial for strips with dedicated white LEDs‚ differing from the standard WLED approach․ When working with larger LED numbers‚ the ESP32’s SPI interface becomes essential‚ as serial buffers might become insufficient for timely data transfer․ Consider the current draw of your chosen strip and select a suitable power supply‚ potentially needing an XT60 connector for higher currents․
Raspberry Pi Integration (Optional)
While the ESP32 handles the LED data transmission via SPI‚ a Raspberry Pi often serves as the central processing unit for HyperHDR‚ capturing HDMI video and processing it for ambient lighting․ The Pi requires Raspberry Pi OS and connects to the ESP32‚ typically using a USB connection․ An HDMI capture card plugged into the Pi’s USB port (bottom left closest to Ethernet is often best) is vital for video input․
An HDMI splitter is commonly used‚ directing one output to the Pi (with the scaler switch on) and another to your TV (scaler off)․ Some users employ a Zigbee relay to remotely control power to the Pi‚ ESP32‚ and USB splitter‚ avoiding manual unplugging․ Remember the Pi uses a dedicated 2A USB power supply‚ separate from the ESP32’s power source․
Power Supplies (Mean-Well LRS-150F-5)
Reliable power is crucial for a stable HyperHDR setup․ The Mean-Well LRS-150F-5 is a recommended power supply‚ providing 5V DC output suitable for both the ESP32 and the LED strip․ It’s important to note the Raspberry Pi requires its own dedicated 2A USB power supply and should not be powered by the Mean-Well unit․
For connecting the LED strip‚ a Molex connector is suggested for lower currents‚ but for higher demands‚ consider an XT60 connector or equivalent․ The Mean-Well unit requires an IEC 320 3-pin 10A 250V socket (C14 input) with a 1A fuse for safety․ Proper mounting‚ potentially with screws‚ ensures a secure and organized installation of the power supply alongside the ESP32 and Raspberry Pi․

Software Setup
HyperHDR installation and ESP32 configuration are key first steps․ Configure the ESP32 for SPI communication‚ utilizing settings like spidev0․0 (SCK11‚ MISO9‚ MOSI10)․
Installing the HyperHDR Software
HyperHDR offers several connection methods‚ including HyperSPI‚ HyperSerialEsp8266‚ HyperSerialESP32‚ and HyperSerialWLED․ The installation process varies depending on your chosen method․ For HyperSPI‚ which is recommended for ESP32 due to its speed‚ you’ll typically download the software package from the project’s repository․
Follow the provided instructions for flashing the firmware onto your ESP32 development board․ This often involves using tools like esptool․py․ Ensure you select the correct board and port during the flashing process․ After flashing‚ the ESP32 will be ready to receive data from your Raspberry Pi or other capture source․ Remember to verify the installation by checking the ESP32’s logs for any errors․
Configuring the ESP32 for SPI Communication
To enable SPI communication on your ESP32 for HyperHDR‚ you need to define the correct pin assignments․ The default configuration‚ spidev0․0‚ utilizes SCK11‚ MISO9‚ and MOSI10․ These pins are crucial for establishing a reliable connection with your Raspberry Pi․

Within the HyperHDR software configuration‚ specify these pin numbers accurately; Incorrect pin assignments will prevent successful data transfer․ Verify these settings against a screenshot of the HyperSPI configuration to ensure consistency․ The ESP32’s SPI interface must be initialized correctly before sending data to the LED strip․ A stable SPI connection is vital for achieving the 40Mhz data transfer speeds possible with the ESP32 and HD107 strips․
SPI Configuration (spidev0․0 ⸺ SCK11‚ MISO9‚ MOSI10)
The spidev0․0 configuration designates specific pins on the ESP32 for SPI communication with the Raspberry Pi․ SCK11 serves as the Serial Clock‚ controlling data transfer timing․ MISO9 is the Master In‚ Slave Out‚ receiving data from peripheral devices․ MOSI10 functions as Master Out‚ Slave In‚ transmitting data from the ESP32․
Confirm these pin assignments within your HyperHDR setup․ A visual reference‚ like a screenshot of the HyperSPI interface‚ is highly recommended for accuracy․ Proper SPI configuration is paramount for achieving the high data transfer rates – up to 40Mhz – necessary for optimal performance with HD107 LED strips․ Double-check these settings to avoid communication errors and ensure a smooth‚ responsive lighting experience․
HyperSPI vs․ HyperSerialESP32
HyperSPI is optimal‚ utilizing the SPI protocol for superior speed and performance‚ especially with larger LED counts and advanced features like 40Mhz transfer․
Advantages of HyperSPI
HyperSPI offers significant advantages over HyperSerialESP32‚ primarily due to the inherent speed and efficiency of the SPI protocol․ This is particularly noticeable when driving a large number of LEDs‚ where the serial buffer in HyperSerial can become a bottleneck‚ hindering timely data transfer․
With HyperSPI and an ESP32‚ you can achieve data transfer rates of up to 40Mhz‚ unlocking the full potential of high-density LED strips like the HD107․ This speed enables smoother‚ more responsive visuals and allows for the implementation of unique modes unavailable in WLED or HyperSerialESP8266;
Furthermore‚ HyperSPI provides a more robust and reliable connection‚ minimizing the risk of data loss or corruption‚ resulting in a consistently high-quality ambient lighting experience․ It’s the recommended choice for demanding applications and users seeking maximum performance․
When to Use HyperSerialESP32
HyperSerialESP32 remains a viable option for users with simpler setups or those prioritizing ease of configuration․ If the RGBRGBW algorithm adequately meets your needs and you aren’t pushing a massive number of LEDs‚ HyperSerialESP32 can provide satisfactory results․
It’s a good starting point to assess compatibility and functionality before committing to the more complex HyperSPI setup․ However‚ be aware that HyperSerialESP32’s performance limitations become apparent with larger LED counts or when attempting advanced visual effects․
Consider HyperSerialESP32 if you’re comfortable with its inherent constraints and don’t require the speed and responsiveness offered by HyperSPI․ It’s a functional alternative‚ but generally outperformed by its SPI counterpart․
Data Transfer Speeds (40Mhz with ESP32)
HyperSPI unlocks significantly faster data transfer speeds‚ reaching up to 40MHz when paired with an ESP32 development board․ This substantial increase in bandwidth is crucial for driving high-density HD107 LED strips and enabling complex‚ dynamic lighting effects․
Compared to the 2Mb speed limitation of HyperSerial connections‚ HyperSPI’s 40MHz capability ensures smoother‚ more responsive visuals‚ particularly when displaying high-resolution or fast-paced content․ This speed advantage allows for real-time synchronization with video sources‚ creating a truly immersive ambient lighting experience․
The ability to handle such high data rates is a key differentiator‚ making HyperSPI the preferred choice for demanding HyperHDR applications․

Connecting and Configuring the LED Strip
Proper wiring to the ESP32 is vital‚ considering RGBRGBW algorithms differ from WLED․ Address larger LED counts carefully for optimal HyperHDR performance․
Wiring the LED Strip to the ESP32
Connecting your LED strip to the ESP32 requires careful attention to the wiring configuration․ Ensure a secure connection to the designated pins for data (MOSI)‚ clock (SCK)‚ and ground (GND)․ The specific pins used depend on your chosen SPI configuration‚ with spidev0․0 typically utilizing SCK11‚ MISO9‚ and MOSI10 on the ESP32․
For higher currents‚ consider using an XT60 connector or equivalent instead of a standard Molex connector to handle the power demands of the LED strip effectively․ Double-check the polarity before applying power to prevent damage․ Proper grounding is crucial for signal integrity and to avoid interference․ Remember to consult the documentation for your specific LED strip and ESP32 development board for accurate pin assignments and voltage requirements․
RGBRGBW Algorithm Considerations
When utilizing RGBRGBW LED strips with HyperHDR and the ESP32‚ understanding the algorithm is vital․ The RGBRGBW algorithm differs from the one used in WLED‚ impacting color accuracy and vibrancy․ It’s crucial to select the correct algorithm within HyperHDR settings to match your LED strip’s configuration․
Incorrect algorithm selection can lead to inaccurate color representation or diminished brightness․ Before diving into HyperSPI‚ experiment with HyperSerialEsp8266 to determine if the RGBRGBW algorithm suits your needs․ This initial testing can save time and effort․ Proper configuration ensures optimal performance and a visually stunning ambient lighting experience‚ maximizing the potential of your HD107 or compatible LED strip․
Addressing Larger LED Numbers
HyperSPI is highly recommended when dealing with a significant number of LEDs‚ as the serial buffer in alternative methods like HyperSerialEsp8266 may become insufficient for timely data transfer․ This limitation can cause flickering or incomplete lighting effects․ The ESP32’s processing power‚ combined with the SPI protocol‚ allows for handling larger LED counts effectively‚ especially with strips like HD107․
For extensive setups‚ ensure adequate power delivery and consider utilizing higher-current connectors like XT60․ HyperSPI’s 40Mhz data transfer capability‚ exclusive to the ESP32‚ further enhances performance with numerous LEDs‚ delivering a smooth and responsive ambient lighting experience․ Careful planning is key to a successful large-scale installation․

Advanced Features and Troubleshooting
HyperHDR offers HDR to SDR switching to prevent black screens‚ alongside HDMI capture card integration for diverse input sources and seamless operation․
HDR to SDR Switching
HDR to SDR switching is a crucial feature within HyperHDR‚ specifically designed to address the common issue of a “black screen” when processing HDR content․ Without this functionality‚ the ESP32 may struggle to correctly interpret and display HDR signals‚ resulting in a loss of video output․ Enabling this switch within the HyperHDR software effectively converts the HDR video stream into a Standard Dynamic Range (SDR) format․
This conversion allows the ESP32 and connected LED strip to accurately reproduce the colors and brightness levels‚ ensuring a consistent and visually appealing ambient lighting experience․ It’s a simple yet powerful solution to a potentially frustrating problem‚ making HyperHDR more user-friendly and reliable for a wider range of HDMI sources and display configurations․
HDMI Capture Card Integration
Integrating an HDMI capture card is essential for feeding video signals to the Raspberry Pi‚ which then processes the data for HyperHDR․ The capture card allows the system to intercept the HDMI stream from a source device‚ like a game console or media player‚ before sending it to the ESP32 for LED synchronization․ Experimentation with different USB ports on the Raspberry Pi is often necessary to find the most stable connection; the port closest to the Ethernet port seems to perform optimally․
Proper placement and configuration of the capture card are vital for reliable video capture and a seamless ambient lighting experience․ A dedicated 2A USB power supply for the Raspberry Pi‚ separate from the Mean-Well power supply‚ is also recommended for optimal performance․
Dealing with “Black Screen” Issues
A common problem encountered during HyperHDR setup is a “black screen” – where no video is displayed on the LED strip․ This often arises from incorrect HDR to SDR switching settings within the HyperHDR software; Enabling the HDR to SDR switch can resolve this issue‚ effectively converting the high dynamic range signal to a standard dynamic range format compatible with the LED strip and ESP32․
Furthermore‚ ensure the HDMI splitter is configured correctly‚ with HDMI OUT 1 going to the Raspberry Pi (scaler switch On) and HDMI OUT 2 to the TV (scaler switch Off)․ Troubleshooting USB port connections for the HDMI capture card is also crucial for a stable signal․
Project Ideas and Applications
HyperHDR with ESP32 enables immersive ambient lighting‚ from dynamic backlights to captivating experiences‚ and even Zigbee-controlled power solutions for your setup․
Ambient Lighting Projects

HyperHDR‚ powered by the ESP32 and utilizing SPI communication‚ unlocks a world of dynamic ambient lighting possibilities․ Imagine a home theater experience where the LED strip seamlessly mirrors the on-screen content‚ creating an immersive visual extension․ Beyond simple color matching‚ HyperHDR’s advanced video pipeline delivers smoother transitions and a more responsive experience․
You can synchronize lighting with music‚ games‚ or movies‚ crafting a truly personalized atmosphere․ The system’s ability to handle larger LED numbers‚ thanks to SPI‚ makes it ideal for expansive setups․ Explore creating reactive lighting displays that respond to sound or motion‚ adding an extra layer of engagement to any room․ The ESP32 allows for complex algorithms and customization‚ pushing the boundaries of what’s possible with ambient lighting․
Creating Immersive Experiences
HyperHDR‚ driven by the ESP32 and SPI protocol‚ transcends basic ambient lighting‚ enabling truly immersive experiences․ Imagine your gaming sessions spilling beyond the screen‚ with dynamic lighting reacting to in-game events․ The faster data transfer rates of SPI‚ reaching 40Mhz with the ESP32‚ are crucial for maintaining synchronization and responsiveness․
This system allows for the creation of captivating visual environments that heighten emotional impact during movies or concerts․ Integrating an HDMI capture card and utilizing HDR to SDR switching eliminates “black screen” issues‚ ensuring a consistent and vibrant display․ The ESP32’s processing power supports complex algorithms‚ allowing for nuanced and detailed lighting effects that draw you deeper into the content․
Zigbee Relay Integration (for power control)
Managing the power demands of a HyperHDR setup‚ involving a Raspberry Pi‚ ESP32‚ and LED strips‚ can become cumbersome․ Integrating a 4-channel Zigbee relay offers a convenient solution‚ automating the power cycling of these components․ This eliminates the need for repeatedly plugging and unplugging devices – a practice one user humorously termed “The HDR Fire Hazard․”
A Zigbee relay allows for remote control and scheduling of power‚ enhancing safety and convenience․ It’s particularly useful for managing the Mean-Well LRS-150F-5 power supply․ Utilizing a dedicated 2A USB power supply for the Raspberry Pi‚ separate from the main power source‚ is recommended; This setup streamlines operation and minimizes potential risks associated with manual power management․